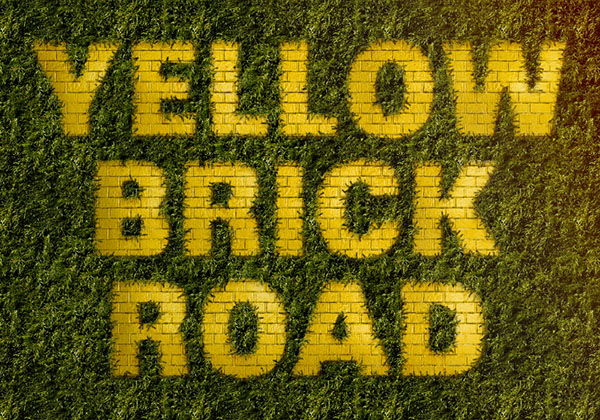
"It's always best to start at the beginning—and all you do is follow the Yellow Brick Road." This tutorial will show you how to use a brick texture, a simple brush, and a couple of layer styles to create a Yellow Brick Road inspired text effect. Let's get started!
Tutorial Assets
The following assets were used during the production of this tutorial.
- SansBlack font
- BrickLargePainted0050 Image 1 (Small)
- Grass0035 Image 1 (Small)
- Grunge Texture 27 by amptone-stock
- Edges Eraser Brush
- Free Pack 6000 photoshop gradients by Supertuts007 (Load the CSP True Sky Gradients.grd file)
1. Create the Text
Step 1
Create a new 1000 x 700 px document, and create the text in All Caps using the font SansBlack, the Size 230 px, and the Color
#f1cc4c.
Set the Leading to 200, and the Kerning to Optical.

Step 2
Duplicate the text layer, change the copy's Fill value to 0, and then duplicate it.

2. Define the Patterns
Step 1
Open the BrickLargePainted0050 image, go to Image > Image Size, and change the dimensions to 350 x 350 px.

Step 2
Go to Edit > Define Pattern, and click OK.

Step 3
Open the Grass0035 image, resize it to 320 x 320px, and define the resized image as a pattern as well.

3. Style the Original Text Layer
Double click the original text layer to apply the following layer style:
Step 1
Add a Bevel and Emboss with these settings:
- Size: 1
- Highlight Mode: Soft Light
- Opacity: 50%
- Shadow Mode - Opacity: 10%

Step 2
Use the default Contour settings.

Step 3
Add a Texture with these settings:
- Pattern: BrickLargePainted0050
- Depth: 280%

Step 4
Add a Pattern Overlay with these settings:
- Blend Mode: Color Burn
- Pattern: BrickLargePainted0050

This will style the main text layer, adding a subtle texture.

4. Style the First Copy Text Layer
Double click the first copy text layer to apply the following layer style:
Step 1
Add a Bevel and Emboss with these settings:
- Style: Chisel Hard
- Check the Anti-aliased box
- Highlight Mode: Soft Light
- Opacity: 50%
- Shadow Mode - Opacity: 45%

Step 2
Add a Contour with these settings:
- Check the Anti-aliased box.

Step 3
Add a Texture with these settings:
- Pattern: BrickLargePainted0050
- Scale: 50%
- Depth: 200%

This will add some more texturing and details to the text.

5. Style the Second Copy Text Layer
Double click the second copy text layer to apply the following layer style:
Step 1
Add a Bevel and Emboss with these settings:
- Size: 100
- Uncheck the Use Global Light box
- Angle: 18
- Altitude: 58
- Check the Anti-aliased box
- Highlight Mode - Opacity: 35%
- Shadow Mode - Opacity: 27%

Step 2
Add a Contour with these settings:
- Check the Anti-aliased box.

Step 3
Add a Texture with these settings:
- Pattern: BrickLargePainted0050
- Scale: 50%
- Depth: 45%
- Check the Invert box

This will add more coloring and detailing to the text.

6. Add the Grunge Texture
Step 1
Place the Grunge Texture 27 image on top of all text layers, and change its layer'sBlend Mode to Color Burn.

Step 2
Click the Create new fill or adjustment layer icon at the bottom of the Layerspanel and choose Levels.

Step 3
Click the Clip to layer icon, and change the Gamma value to 2.24.

7. Add the Grass Texture
Step 1
Create a new layer on top of all layers and call it Grass.
Pick the Paint Bucket Tool, and in the Options bar, choose the Pattern fill type, and use the Grass0035 pattern to fill the Grass layer.

Step 2
Add a Levels adjustment layer, click the Clip to layer icon, and change the Gammavalue to 0.50.

Step 3
Command-click any text layer's thumbnail to create a selection, and go to Select > Inverse.

Step 4
With the Grass layer selected, click the Add vector mask icon at the bottom of theLayers panel.

8. Erase the Edges
Step 1
Right click any text layer and choose Create Work Path, and then click the Grasslayer's mask thumbnail.

Step 2
Pick the Eraser Tool and choose the Edges brush tip, set the Foreground color to
Black, and hit the Return key to stroke the edges with the brush tip.
An alternative way would be to pick the Direct Selection Tool, right click the work path, choose Stroke Path, and then choose Eraser from the Tool drop-down menu and click OK.
With the Direct Selection Tool selected, hit the Return key to get rid of the work path.

9. Add the Grass Shadow
Double click the Grass layer to add a Drop Shadow effect using the following settings:
- Blend Mode: Linear Burn
- Opacity: 15%
- Uncheck the Use Global Light box
- Angle: 60
- Distance: 8
- Spread: 5
- Size: 1

This will add a subtle shadow to the grass layer.

10. Adjust the Coloring of the Final Result
Step 1
Click the Create new fill or adjustment layer icon and choose Gradient.
Use the Gradient shown below, change the Angle to a value around 26, and check the Dither box.
After that, change the Gradient layer's Blend Mode to Hard Light and its Opacityto 20%.

Step 2
Select all the layers you have, duplicate them, and go to Layer > Merge Layers.
Rename the merged layer to High Pass, and go to Filter > Convert for Smart Filters.

Step 3
Go to Filter > Other > High Pass, and change the Radius to 5.

Step 4
Change the High Pass layer's Blend Mode to Pin Light and its Opacity to 50%.

Step 5
Finally, add a Curves adjustment layer, and play around with the curve until you get a result you like.

You can adjust the Gradient, High Pass filter, and/or the Curves settings to get a final outcome you're happy with.

Congratulations! You're Done
In this tutorial, we created a couple of text layers, and used multiple layer styles to achieve the textured brick effect.
Then, we added the grass and used a work path with a simple grass brush to create the edges around the brick text.
Finally, we used a couple of adjustment layers and a filter to enhance the coloring and the look of the final result.
Please feel free to leave your comments, suggestions, and outcomes below.
أدهم أبهابي مدون محترف مهووس بالتطوير و تغيير ألوان قوالب بلوجر ، أحب ألعاب الفيديو و كرة القدم، ناجحٌ في دراستي إتكلم الفرنسية و الإنجليسية و مالك مدونة نجوم ويب.
محول الاكواد محول الأكواد اضافة الإبتسمات اضافة الإبتسمات تابع المدونة تابع المدونة